Tuesday, March 6, 2012

How to Convert DVD to MP4?

I am fond of watching movies. I always download the newest one in the first time, but you know, their format is DVD mostly. Every time, I don’t know how to transfer them to MP4 format to my iPad, and I waste much time. Afterwards, my friend told me a best converter to solve my problem easily. I can’t help sharing it with everyone.
DVD to MP4 Converter Reviews listed a lot of DVD to MP4 Converter and DVD to MP4 Converter for Mac software for you so that you can find the best DVD to MP4 Converter software.
DVD to MP4 Converter is just the one I have used to convert my DVD movies to MP4 to my iPad. It is the best product, and can convert DVD files to MP4, MOV, MP3, AAC as well as other video and audio formats. It supports MP4 players such as iPhone, iPod, iPad, PSP, and PS3 and so on.
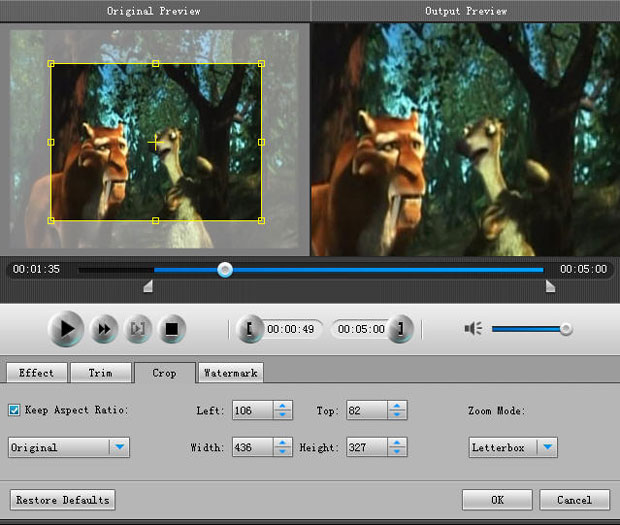
Furthermore, it provides powerful functions to trim or crop video, and merge files for one. You can cut your favorite part of DVD movie with this converter, and you also can adjust the screen size to crop it.
When I use it, I find that I need only several steps, after which it will finish all work in a very short time with best quality as there is no loss of sound or image quality.
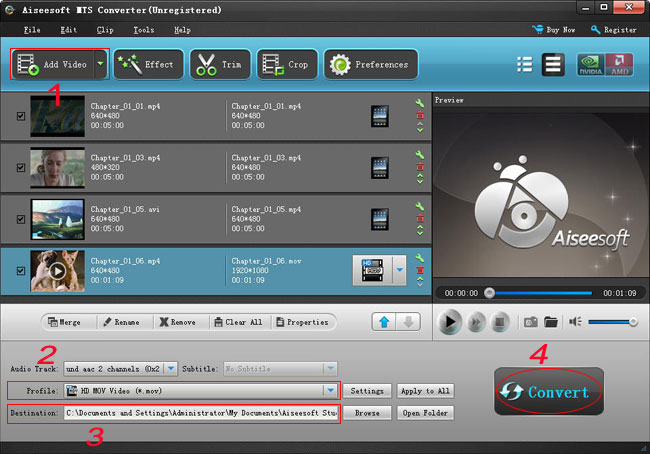
Download this best converter first, and run it. You just need some steps.


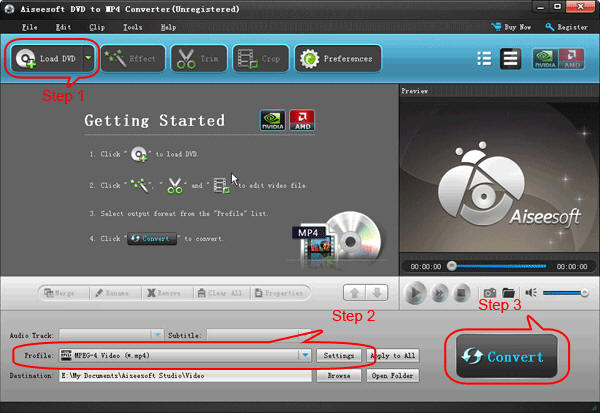
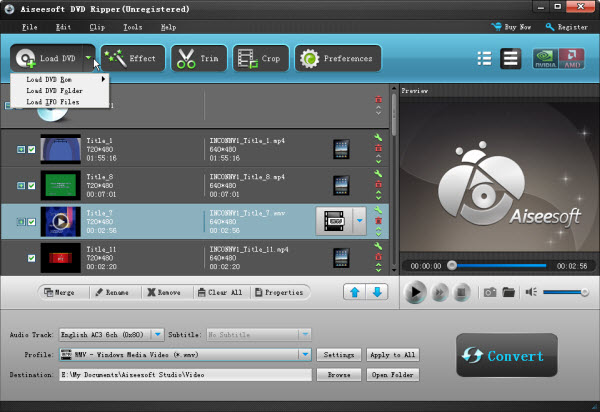
Step 1: Load DVD. Click Load DVD to import your DVD files to the converter.

Step 2: Click the drop-down list of Profile option, and select MP4 as the output format. You can click the “Settings” button to set up its details such as the video resolution and the audio channel.
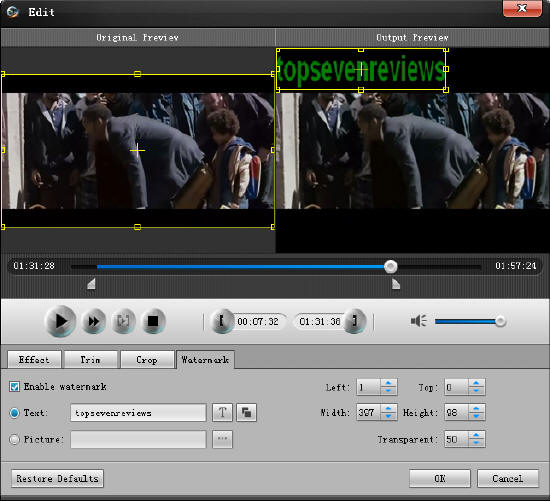
In the front, I say it can trim video. Now you can see how to do that from the below image.


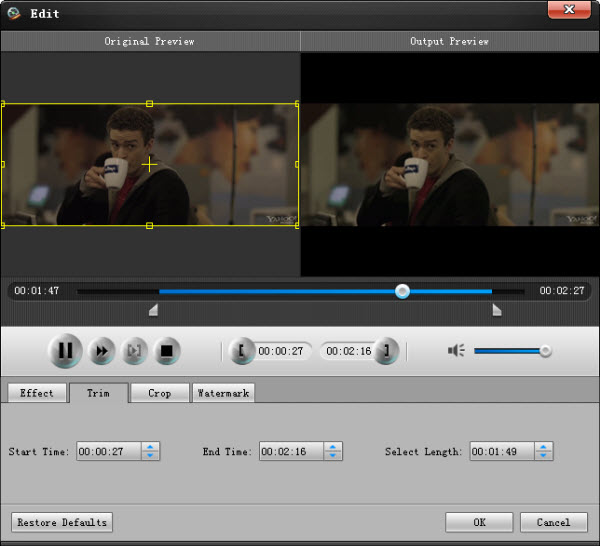
There are two methods to finish this work. Drag the sliders under the screen to adjust the start time and end time. Or you can set the time parameters in the two corresponding field. Then click OK to end the trimming work or just click Restore Defaults to quit if you feel dissatisfied.
Step 4: Click Convert button to start conversion. You will get it one moment later.

For Mac users, you can refer to DVD to MP4 Converter for Mac, which is as excellent as the front one.

Sunday, March 4, 2012

How to Convert MTS Files?

Maybe you are frequently worried about a problem that how do people deal with MTS files when PC or Mac doesn’t support the format?
MTS Converter is specially designed to solve this problem. It supports to convert HD video to general video, convert general video to HD video, convert among HD videos, such as HD TS, HD MTS, HD WMV, HD MPG, HD MPEG4, H.264/AVC , HD AVI, HD ASF, etc. And this product allows you to convert MTS to MOV, AVI, DivX, XviD, ASF, WMV, MKV, FLV, SWF, VOB, or audio formats like AAC, AC3, AIFF, AMR, AU, FLAC, MP3, M4V, MP2, OGG, WAV and WMA. Furthermore, you can also convert M2TS and TS files, and it allows to convert MTS files to various video devices such as iPod, iPhone, Apple TV, Mobile Phone, PS3, PSP, Zune, etc.

This converter is a powerful and professional product, which can finish the conversion at the fastest speed with the least quality loss yet. It provides a list of powerful editing functions including cropping, trimming, and merging as well as effect adjustment.
Let’s learn to use the converter together.


There are several steps, just follow them and you can master it easily.

Step 1: Click File option or Add Video button to add what you are to convert. If there are two or more files, you can merge them into on file.

Step 2: Set up output format from the drop-down list behind the “Profile” option. Just click Settings to set up the details like video’s encoder, frame rate, resolution, aspect ratio, and bitrate as well as the audio’s encoder, sample rate and channels.

For example, when you crop the file being converted, choose the Crop option, and drag the slider to adjust the screen, and you can see the output proview.


Step 3: Click Browse button to select the destination as the output folder.

Step 4: After all the steps above, click Convert button to start converting your files.

For Mac uses, you can choose MTS Converter for Mac. It also provides the best functions.

How to Convert Videos to iPad?

Many people prefer to download movies and watch them on iPad rather than go to the cinema. But there is a problem, how do you deal with it when your iPad doesn’t support the format?
iPad Video Converter Reviews provide you iPad Video Converter and best iPad Video Converter for Mac software, which can help you to convert video to iPad easily. It permit you to enjoy DVD, music and video clips on iPad at anytime and anywhere.

iPad Video Converter, the best tool to convert any video (AVI, MPEG, WMV, DivX, MP4, MOV, RM, RMVB, ASF and 3GP, etc.) and audio format (MP3, AAC, WAV and so on) into iPad, can help you solve all problems about conversion. It can extract audio from videos and convert them into iPad audio formats.
Besides, you can extract pictures according to your requirement from videos by taking snapshots while previewing. This best converter considers all aspects and never lets you down, because you are allowed to freely adjust output parameters, including bit rate, codec, frame rate, sample rate, etc. What’s more, it provides functions to trim, crop, merge and add watermark.

It is very easy to use, and you can grasp it just from the following interface. For Mac users,iPad Video Converter for Mac is your best choice. It is as excellent as the front one.


There are only several steps for you to convert video to iPad.

Fist, run the best converter after having downloaded it.

Click “Add File” to load the video you want to convert. On the right, click the play button to preview it, and you can take a snapshot of it.

Second, choose its output format from the drop-down list of “Profile” option. You can click “settings” button to set up the video’s details, such as the resolution, frame rate, video and audio bitrates, and so son.

Don’t forget to set the destination. Just click “Browse”, and select your iPad as your destination.

Third, click “Clip” button above, choose “Effect”, “Trim”, “Crop” or “Watermark” to edit the video and make it more perfect.
Take “Watermark” for example. Select the box called “Enable Watermark”. You can see that there are two methods for you to add watermark: text and picture. Click the “Text” option, fill in what you want to add, and you can set up the width, height and transparent of the text box from the output preview. You can also choose its specific location from the “Left” and “Top” options.
Click “OK” to finish the watermark, and click “Restore Defaults” to exit.
If you’re going to add a picture, just select the “Picture” option, click the “browse” button, and add your picture.


Finally, click “Convert” button to start convert your video. Just wait a moment, and you’ll get it.

Friday, March 2, 2012

The Best Tool to Rip DVD Files

Best DVD Ripper, is the best one I have tried to rip DVD files. Once, I wanted to watch a DVD movie on my iPad, but it didn’t support the format. My friend recommended me to use this product. She said it offers free trail. I followed her suggestions and downloaded it. And I successfully ripped the DVD movie in a short time and enjoyed it with my friend. I can’t help recommending this Best DVD Ripper to everyone.
Best DVD Ripper, which is specially designed to rip DVD files, can easily rip DVD to video formats (MP4, MOV, AVI, WMV, 3GP, etc.) and even HD video. Besides, you can set audio tracks and subtitle according to your requirements as it allows users to rip DVD to audio files like MP3, AAC, AC3, AIFF, etc.


It does more than you think. Maybe you don’t want to use iPad, never mind! This Best DVD Ripper can rip DVD not only to iPad, but also to PSP, iPod, iPhone, Zune, BlackBerry, Creative Zen, Apple TV, Xbox, NDs, Mobile phone, etc. More functions are thoughtfully taken into account to provide users more convenience. You can trim the start time and end time of the DVD to be ripped; you can crop it by modifying the frame and setting its aspect ratio; and you can also select several files to merge them, after which you will get the synthetic one. If you prefer to make a mark on it, just click the “clip” button, choose “watermark” option, and then you can add pictures as well as texts. I added a small photo with my name on the video when I rip the DVD, and it seems perfect.
Click “Effect” button, and you can set up the brightness, contrast and saturation. Finally, click “Settings”, and start ripping your DVD.

For Mac users, you can refer to Best DVD Ripper for Mac. It is as excellent as the front one. For example, if you want to clip the audio’s time length, click the “Trim” button. Then you can trim it with two methods. One is that you can drag the slider under the video to set the start time and finish time. Or you can click “Start Time” and “End Time” to select the time length.


At last, wait just one moment, you’ll get it. Everything is as you wish.